Thursday, May 31, 2012
Freebie! Cobalt Butterfly Cluster Frame

Freebie! Rustic Sunflower Cluster Frame

New PTU Kit Rustic Sunflower


Tuesday, May 29, 2012
New PTU Kit Cobalt Butterfly
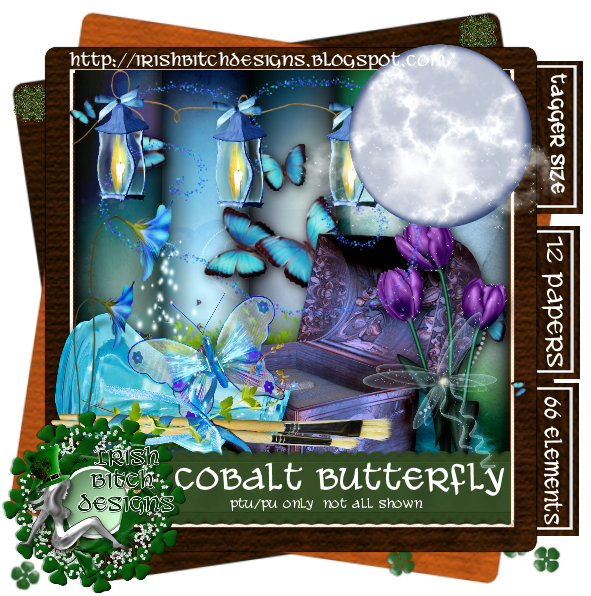
In stores Today!!!!!
Thursday, May 24, 2012
New PTU Kit Mermaid Magick

Monday, May 21, 2012
FTU Bi-Polar Awareness Tut

Any resemblance to any other tutorial or signature is merely coincidental and is not intended.
I am using the artwork of Gorjuss –. You can purchase her artwork and a license to use them HERE you MUST have a license to use her work
I am using the artwork of Gorjuss –. You can purchase her artwork and a license to use them HERE you MUST have a license to use her work
I am using the font: Kings Dominion
I am using plugins:, MaRu Meister Copies, Eye Candy 3.1 Glow
Pieces of the kit used in this tutorial are
Paper 03
Paper 01
Mini Frame
Scatter01
Cloud 01
Rain
Flower 1
Flower 2
You must have working knowledge of PSP to complete this tutorial. This tutorial was written using PSPXII
Open new Canvas 600*600
Open paper 03 and resize to 600*600. Paste apply mask and resize to your liking, Merge Group
Open Mini Frame c/p to canvas, resize to your liking
Open Paper 01, resize to 600*600. Paste under your frame, using your Magic Wand, select the inside of your frame, go to Selections, Modify, Expand, 5 pixels. Select okay, invert selection and delete leaving the inside of the frame with your paper
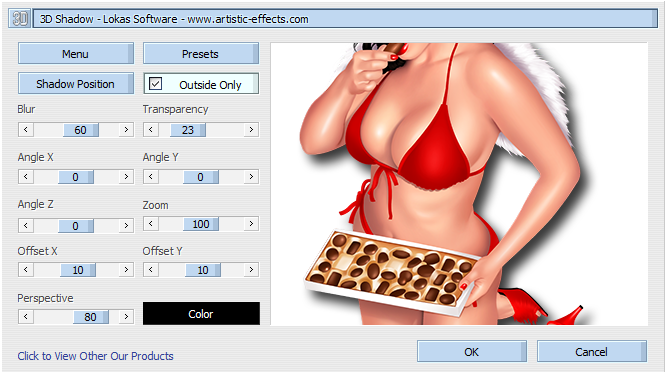
Paste your full tube paste on top of Frame, resize and place to your liking, Apply Lokas 3-D plug in
Scatter01, resize and paste over your mask, duplicate, mirror, flip
Cloud 01, resize and place to your liking,
Rain, Resize and place to your liking, duplicate, mirror
Flower1, resize, apply Copies Plugin

Select only 6 flowers, invert and delete leaving only those flowers, resize so they only cover the bottom of the frame.
Flower 2, apply copies again, but only choose 5 for the number, resize and place so they fill the gaps between the green flowers
Apply drop shadow to your taste. Mine are all 2*2’s
Resize the signature if needed
The name. Using the Kings Dominion size 36 Color #344777, Candy 3.1 Glow 2 pixel, fat setting color #fffff
Drop Shadow to your liking
Add your copyright information and license number before save
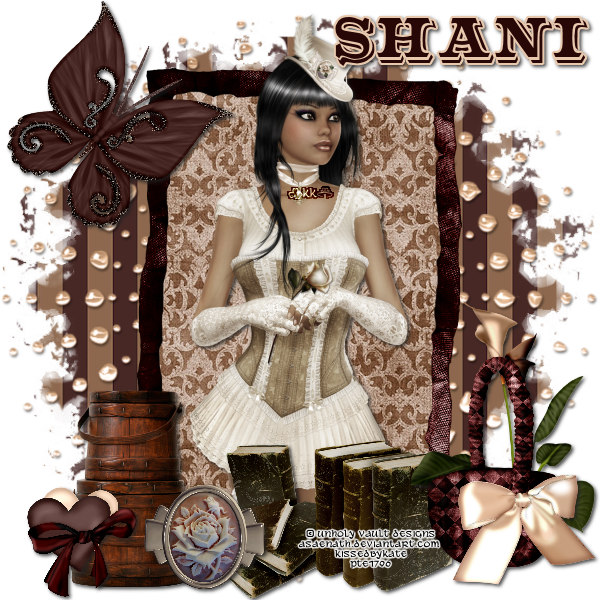
PTU Georgetta Cartrite Tut
Any resemblance to any other tutorial or signature is merely coincidental and is not intended.
I am using the artwork of Unholy Vault Designs You can purchase their artwork and a license to use them HERE you MUST have a license to use their work
I am using the artwork of Unholy Vault Designs You can purchase their artwork and a license to use them HERE you MUST have a license to use their work
I am using the font: Cameo Antique
I am using plugins:, Eye Candy 3.1 Glow
Pieces of the kit used in this tutorial are
PP8
PP12
Crumpled Frame
Drop Frame
Hat Box
Basket
Pin
Calla Lily
Books
Fancy Butterfly
Double Hearts
You must have working knowledge of PSP to complete this tutorial. This tutorial was written using PSPXII
Open new Canvas 600*600
Open new Canvas 600*600
Open PP8 and resize to 600*600. Paste apply mask and resize to your liking, Merge Group,
Open Rectangle Frame c/p to canvas, rotate and resize to your liking.
Open PP12, resize to 600*600. Paste under your frame, using your Magic Wand, select the inside of your frame, go to Selections, Modify, Expand, 3 pixels. Select okay, invert selection and delete leaving the inside of the frame with your paper.
Paste full tube on top of the frame, arrange to your liking, Drop Shadow
Drop Frame rezsize and Place to your liking and place over the top of the mask
Hat Box, resize and place to your liking
Basket, resize and place to your liking
Pin, resize and place to your liking
Calla Lily, resize and place to your liking
Books, resize and place to your liking
Fancy Butterfly, resize, rotate and place to your liking
Double Hearts, resize and place to your liking
Apply drop shadow to your taste. Mine are all 2*2’s
Resize the signature if needed
The name. Using Cameo Antique size 14 Color #280707, Selections, Select Vector Layer, new layer, selections, Modify, Expand, 2 pixels, flood fill with #e9c9ae
Drop Shadow to your liking
Add your copyright information and license number before save
New PTU Kit Farmer's Daughter

New Kit, In stores today, a little bit country, a little bit rustic, a lot classy.
Friday, May 18, 2012
PTU Tropical Oasis TUT

Any resemblance to any other tutorial or signature is merely coincidental and is not intended.
I am using the artwork of Elias Chatzoudis You can purchase his artwork and a license to use them HERE you MUST have a license to his work
I am using the artwork of Elias Chatzoudis You can purchase his artwork and a license to use them HERE you MUST have a license to his work
I am using the font: Hawaiian Punk
I am using plugins: Eye Candy 3.1 - Glow
Pieces of the kit used in this tutorial are
PP6
Hawaii
Ball
Tiki Torch
Tiki 2
PailShovel
Flamingo
Castle
You must have working knowledge of PSP to complete this tutorial. This tutorial was written using PSPXII
Open new Canvas 600*600
Open new Canvas 600*600
Open PP6 and resize to 600*600. Paste apply mask and resize to your liking, Merge Group,
Open Hawaii c/p to canvas, resize to your liking.
Take the full tube and paste it and move it to the right side of the siggy,
Ball, resize and place to your liking
Tiki Torch, resize and place to your liking
Tiki2 resize and place to your liking
Pail Shovel resize and place to your liking
Flamingo resize and place to your liking
Castle resize and place to your liking
Apply drop shadow to your taste. Mine are all 2*2’s
Resize the signature if needed
The name. Hawaiian Punk size 26 Color # #7c0407, apply Eye Candy 3.1 Glow color #efe400, Fat, Pixels 3
Drop Shadow to your liking
Add your copyright information and license number before save, resize if needed
Thursday, May 17, 2012
New PTU Kit Wiki Wiki Tiki

In Stores Now!
Wednesday, May 16, 2012
PTU Go West Forum Set Tut


Any resemblance to any other tutorial or signature is merely coincidental and is not intended.
I am using the artwork of Elias Chatzoudis–. You can purchase his artwork and a license to use them HERE you MUST have a license to use his work
I am using the artwork of Elias Chatzoudis–. You can purchase his artwork and a license to use them HERE you MUST have a license to use his work
I am using the font : Nashville
I am using plugins: Penta.com Color Dot , Eye Candy 3.1, Glow,
Pieces of the kit used in this tutorial are
Paper 12
Grass
Swing
Bucket
Bird House
Green01
Bench
Horse
You must have working knowledge of PSP to complete this tutorial. This tutorial was written using PSPXII
Open new Canvas 600*250
Open Paper 12, resize to 600*600, Paste, crop to fit
Selections, Select all
Selections, Modify, Selection Borders, Size 7, invert
New Layer, Flood Fill with #5e2a18
Penta.com Color Dot

Paste your tube, move to Left side, resize as you like, drop Shadow
Grass, resize and place to your liking
Swing, resize and place to your liking
Bucket resize and, place to your liking
Lighthouse, resize and place to your liking
Birdhouse, resize and place to your liking
Green01, resize and place to your liking
Bench, resize and place to your liking
Horse, resize and place to your liking
Apply drop shadow to your taste. Mine are all 2*2’s
The name. Nashville Size 22, color #5e2a18, Eye Candy 3.1 Glow 3 pixel, fat setting color #FFFFF
Drop Shadow to your liking
Add your copyright information and license number before save
Now for the Avatar
Open new Canvas 150*200
Resize Paper 1 to 200*200, Paste
Add Border with Previous settings, only with 4 instead of 7
Add your tube and delete excess
Add your elements
Add Copyright and liscense number
Add your initial, or text, effects like before
Monday, May 14, 2012
PTU The Blues Tut

Any resemblance to any other tutorial or signature is merely coincidental and is not intended.
I am using the artwork of Freya Langford-Sidebottom –. You can purchase her artwork and a license to use them HERE you MUST have a license to use his work
I am using the artwork of Freya Langford-Sidebottom –. You can purchase her artwork and a license to use them HERE you MUST have a license to use his work
I am using the font: Music Hall
I am using plugins: Eye Candy 3.1
Pieces of the kit used in this tutorial are
RDPaper05
RDPaper07
RDFrame02
Piano Keys
Curtains
Piano
Music Stand
Flowers
You must have working knowledge of PSP to complete this tutorial. This tutorial was written using PSPXII
Open new Canvas 600*600
Open RDPaper 05. Paste apply mask and resize to your liking, Merge Group
Open RDframe02 c/p to canvas, resize to your liking, Paste Paper07 Paste under your frame, using your Magic Wand, select the inside of your frame, go to Selections, Modify, Expand, 3 pixels. Select okay, invert selection and delete leaving the inside of the frame with your paper.
Paste close up of tube under the frame, place to your liking, and repeat the process above to get your tube inside the frame only, apply Luminance Legacy, drop shadow
Paste your full tube layer on top, with the cello, resize and place to your liking,
Piano Keys, resize and place to your liking
Curtains, resize and place to your liking,
Piano, Resize and place to your liking,
Music Stand, Resize and place to your liking
Flowers, Resize and place to your liking, duplicate, mirror
Apply drop shadow to your taste. Mine are all 2*2’s
Resize the signature if needed
The name. Using the Music Hall size 48 Colors #0d1433 Candy 3.1 Glow 3 pixel, fat setting color #fffff,
Drop Shadow to your liking
Add your copyright information and license number before save
New PTU Kit Cherries & Cream

Cherries & Cream.....now in stores
Thursday, May 10, 2012
New PTU Kit Once Upon a Forest

New Kit in Stores today! Enjoy!
Tuesday, May 8, 2012
PTU Spring-a-ling Emo Tut

Any resemblance to any other tutorial or signature is merely coincidental and is not intended.
I am using the artwork of Very Many, you can purchase her artwork at PFD, you MUST have a license to use her work!
I am using the artwork of Very Many, you can purchase her artwork at PFD, you MUST have a license to use her work!
I am using Scrazy Scraps PTU kit “Spring-a-ling Emo” You can purchase that here
I am using the font: AlicoScriptSSK
I am using the font: AlicoScriptSSK
Pieces of the kit used in this tutorial are
Paper 5
Paper 12
Frame 2
Element 58
Element 14
Element 46
Element 39
Element 45
Element 16
Element 15
You must have working knowledge of PSP to complete this tutorial. This tutorial was written using PSPXII
Open new Canvas 600*600
Open Paper 5 and resize to 600*600. Paste apply mask and resize to your liking, Merge Group,
Open Frame 2 c/p to canvas, resize to your liking.
Open paper 12, resize to 600*600. Paste under your frame, using your Magic Wand, select the inside of your frame, go to Selections, Modify, Expand, 3 pixels. Select okay, invert selection and delete leaving the inside of the frame with your paper.
Paste Full tube, Mirror, Drop Shadow. Fill the 3 frames with what ever bits of the tube you want, repeat the above to get only the tube inside the frame showing, apply luminance legacy.
Element 58, resize and place to your liking,
Element 14, resize and place to your liking
Element 46 resize and place to your liking
Element 39, resize and place to your liking
Element 45, resize and place to your liking,
Element 16, resize and place to your liking
Element 15, resize and place to your liking
Apply drop shadow to your taste. Mine are all 2*2’s
Resize the signature if needed
The name. Using AlicoScriptSSK Size 36, color #00000. Alien Skin 3.1 glow, Pixel width 3, 100% Opacity, Fat Setting
Drop Shadow to your liking
Add your copyright information and license number before save
PTU Faery Dust Tut

Any resemblance to any other tutorial or signature is merely coincidental and is not intended.
I am using the artwork of Lady Mishka –. You can purchase his artwork and a license to use them HERE you MUST have a license to use his work
I am using the artwork of Lady Mishka –. You can purchase his artwork and a license to use them HERE you MUST have a license to use his work
I am using the font FairyDust
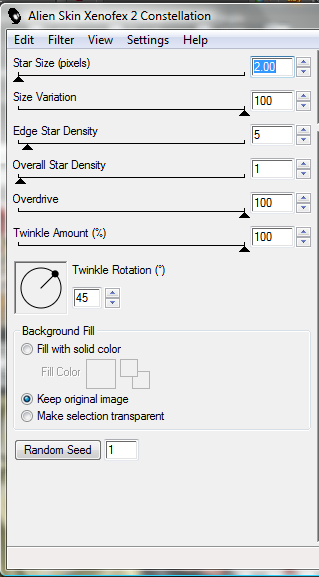
I am using plugins: Lokas 3D shadow, Alien Skin 3.1 glow, Xenofex2 Constellation
Pieces of the kit used in this tutorial are
RD 19
RD 27
RD1
RD 18
RD 11
RD 12
Candles
Cauldron
Bottle 01
You must have working knowledge of PSP to complete this tutorial. This tutorial was written using PSPXII
Open new Canvas 600*600
Open RD 19. Paste apply mask and resize to your liking, Merge Group
Open RD27 c/p to canvas, resize to your liking
Paste your full tube layer on top, resize and place to your liking, Apply Lokas 3-D plug in
RD1, resize and place to your liking
RD18, resize and place to your liking,
RD11, Resize and place to your liking, duplicate, mirror
RD 12, Resize and place to your liking
Apply drop shadow to your taste. Mine are all 2*2’s
Resize the signature if needed
The name. Using the FairyDust size 30 Colors #6db00d, Candy 3.1 Glow 3 pixel, fat setting color #fffff, then Xenofex2 Constellation
Drop Shadow to your liking
Add your copyright information and license number before save
PTU Tut Rustiq Luv

Any resemblance to any other tutorial or signature is merely coincidental and is not intended.
I am using the artwork of Barbara Jensen–. You can purchase her artwork and a license to use him HERE you MUST have a license to use her work
I am using the artwork of Barbara Jensen–. You can purchase her artwork and a license to use him HERE you MUST have a license to use her work
I am using the font: Nashville
Pieces of the kit used in this tutorial are
KKpaper13
KKpaper14
KKpaper15
KK Frame1
KK Shutters
KK Grass
KK Sparkles
KK Clouds
KK Charm Clip
KK Rope Heart
Flower4
Flower3
You must have working knowledge of PSP to complete this tutorial. This tutorial was written using PSPXII
Open new Canvas 600*600
Open KKPaper 13. Paste apply mask and resize to your liking, Merge Group,
Open KKframe1 , c/p to canvas, resize to your liking.
Open KKpaper14,. Paste under your frame, using your Magic Wand, select the inside of your frame, go to Selections, Modify, Expand, 3 pixels. Select okay, invert selection and delete leaving the inside of the frame with your paper.
Open Shutters, paste, and resize, place to your liking
KKPaper15, paste under the shutters use the above to leave the paper only under the window.
The Tube. Use the close up under Frame1, place to your liking, using the steps with the magic wand, leave only the tube under the frame, apply Lumiance Legacy, Drop Shadow to your liking.
Close up under the shutters, place to your liking, again with the magic wand to make it fit, apply hard light and drop shadow
Full size tube, resize and place to your liking, drop shadow
KK Grass, Paste over the top of your Mask, place to your liking,
KK Sparkles resize and place to your liking, over the main frame
KK Celtic Knot Bush, resize and place to your liking
KK Clouds Resize and place to your liking,
Charm Clip, resize and place to your liking
KK Doodle resize and place to your liking
Rope Heart, resize, place to your liking
Flower4, resize, place to your liking
Flower3, resize, place to your liking
Apply drop shadow to your taste. Mine are all 2*2’s
Resize the signature if needed
The name. Using Irish Saddle, size 22 Colors #01baaf, Stroke width 1 with color #291006 Drop Shadow to your liking
Add your copyright information and license number before save
Subscribe to:
Posts
(Atom)
MY BLINKIE

Facebook Me
Stores I Sell In


Who I CT For

 "
"
CU Licenses