Friday, May 30, 2014
Love and Peace PTU Tut


Any resemblance to any other tutorial or signature is merely coincidental and is not intended.
I am using the artwork of Di_Halim –. You can purchase this artwork and a license to use them HERE you MUST have a license to use this work (Love and Peace)
I am using the font: Bellbottom Laser
I am using the Plugins: Alien Eye Candy 5
I am using "Hippie Love" From Abstract Creations, you can find it here
I am using mask of your choice
I am using Drop Shadow -3 Vert, 3 Hori, Opacity 74, Blur 5.8 Color #202020
Pieces of the kit used in this tutorial are
Paper 4
Paper 3
Element 34
Element 40
Element 46
Element 28
Element 10
Element 13
Element 22
Element 43
Element 17
You must have working knowledge of PSP to complete this tutorial. This tutorial was written using PSPX6
Open new Canvas 600*600
New Layer, flood fill with Paper 4, Apply mask and resize to your liking, Merge Group
C/P Element 34, resize to your liking, Use Free hand Select and go around the outside of the frame. New Layer, Flood fill with Paper 3.
Paste Close up Tube between Paper 1 and Frame 5. Select paper layer, select all, float, invert, Select Tube Layer Delete. Duplicate. Apply Guassian Blur 3.0 on Original layer, Drop Shadow. On Copy Apply Soft Light
Paste Full tube, resize and place to your liking, drop shadow
Element 40, resize and Place to your liking, drop shadow
Element 46, resize and Place to your liking, mirror, drop shadow
Element 28, resize and Place to your liking, drop shadow
Element 10, resize and Place to your liking, drop shadow
Element 13, resize and Place to your liking, drop shadow
Element 22, resize and Place to your liking, drop shadow
Element 43, resize and Place to your liking, drop shadow
Element 17, resize and Place to your liking, drop shadow
Resize the signature if needed
The name: I am using the font: BellBottom Laser, size 20, #d7336d, Apply Eye Candy #f6e959, Drop Shadow

Add your copyright information and license number before save

Wednesday, May 28, 2014
Sea Lovers PTU Tut


Any resemblance to any other tutorial or signature is merely coincidental and is not intended.
I am using the artwork of Derzi –. You can purchase this artwork and a license to use them HERE you MUST have a license to use this work (Sea Lovers - Black/Purple/Green Layer)
I am using the font: Always Beside You
I am using the Plugins: Alien Eye Candy 5
I am using "Eileen Red Carpet" From Tiny Turtle Designs, you can find it here
I am using mask of your choice
I am using Drop Shadow -3 Vert, 3 Hori, Opacity 74, Blur 5.8 Color #202020
Pieces of the kit used in this tutorial are
Paper 18
Paper 13
Element 20
Element 60
Element 73
Element 24
Element 25
Element 28
Element 19
Element 38
Element 6
You must have working knowledge of PSP to complete this tutorial. This tutorial was written using PSPX6
Open new Canvas 600*600
New Layer, flood fill with Paper 18, Apply mask and resize to your liking, Merge Group
C/P Element 20, resize to your liking, Use Free hand Select and go around the outside of the frame. New Layer, Flood fill with Paper 13.
Paste Full tube, resize and place to your liking, drop shadow
Element 60, resize and Place to your liking, drop shadow
Element 73, resize and Place to your liking, drop shadow
Element 24, resize and Place to your liking, drop shadow
Element 25, resize and Place to your liking, duplicate, mirror, drop shadow
Element 28, resize and Place to your liking, duplicate, mirror, drop shadow
Element 19, resize and Place to your liking, drop shadow
Element 38, resize and Place to your liking, duplicate, mirror, drop shadow
Element 6, resize and Place to your liking, duplicate, mirror, drop shadow
Resize the signature if needed
The name: I am using the font: Always Beside You, size 20, #90729d, Apply Eye Candy #ffffff, Drop Shadow
Add your copyright information and license number before save
Monday, May 26, 2014
New PTU Kit - Avalon

Avalon is the Isle of the Fae in Arthurian Legends, the place where Exclaibur was found. This kit is perfect for any Fae, Fantasy, or Fairy tale tags
10 1000*1000 Papers (Tagger Size)
90 Unique Elements
Thursday, May 22, 2014
FTU Emerald Cluster Frame

I made this Cluster using "Birthstone - Emerald" From Tasha's Playground. You can download this freebie here
Emerald PTU Tut

Any resemblance to any other tutorial or signature is merely coincidental and is not intended.
I am using the artwork of Enamorte –. You can purchase this artwork and a license to use them HERE you MUST have a license to use this work (18-1)
I am using the font: Angelo
I am using the Plugins: Alien Eye Candy 5, Xeno Porcelian, Xeno Radience
I am using "Birthstone - Emerald" From Tasha's Playground, you can find her stores here
I am using mask of your choice
I am using Drop Shadow -3 Vert, 3 Hori, Opacity 74, Blur 5.8 Color #202020
Pieces of the kit used in this tutorial are
Paper 1
Paper 2
Frame 3
Leaves 2
Swag
Branch
Leaves
Leaf 2
Scatter
Flower 1
Brooch
You must have working knowledge of PSP to complete this tutorial. This tutorial was written using PSPX6
Open new Canvas 600*600
New Layer, flood fill with Paper 1, Apply mask and resize to your liking, Merge Group
C/P Frame 3, resize to your liking, Use Magic Wand, select the inside of the frame. Selections - Modify - Expand 5.0 pixels. New Layer, Flood fill with Paper 2.
Paste Close up Tube between Paper 1 and Frame 5. Select paper layer, select all, float, invert, Select Tube Layer Delete, Apply Xero Porcelain, and then Xero Radience, Drop Shadow, Duplicate. Apply Guassian blur 5.0 to copy, then set to Screen and drop Opacity to 60%.
Paste Full tube, resize and place to your liking, drop shadow
Leaves 2, resize and Place to your liking, duplicate, mirror, drop shadow
Swag, resize and Place to your liking, drop shadow
Branch, resize and Place to your liking, duplicate, mirror, drop shadow
Leaves, resize and Place to your liking, duplicate, mirror, drop shadow
Leaf 2, resize and Place to your liking, duplicate, mirror, drop shadow
Scatter, resize and Place to your liking, drop shadow
Flower 1, resize and Place to your liking, duplicate, mirror, drop shadow
Brooch, resize and Place to your liking, drop shadow
Resize the signature if needed
The name: I am using the font: Angelo, size 26, #354c41, Apply Eye Candy #ffffff, Drop Shadow
Add your copyright information and license number before save
Magical Lady Bug PTU Tut


Any resemblance to any other tutorial or signature is merely coincidental and is not intended.
I am using the artwork of Ninaste –. You can purchase this artwork and a license to use them HERE you MUST have a license to use this work (Lady Bug - Purple and Black Layer)
I am using the font: Fontdinerdot Sparkly
I am using the Plugins: Alien Eye Candy 5, Lokas 3-D
I am using "Magic Dreams" From Tiny Turtle's Designs, you can find it here
I am using mask of your choice
I am using Drop Shadow -3 Vert, 3 Hori, Opacity 74, Blur 5.8 Color #202020
Pieces of the kit used in this tutorial are
Paper 13
Paper 3
Element 9
Element 18
Element 57
Element 96
Element 51
Element 14
Element 16
Element 12
Element 73
Element 11
Element 26
Element 43
Element 106
Element 90
You must have working knowledge of PSP to complete this tutorial. This tutorial was written using PSPX6
Open new Canvas 600*600
New Layer, flood fill with Paper 13, Apply mask and resize to your liking, Merge Group
C/P Element 9, resize to your liking, Use magic wand, select inside of the frame. Selections, Expand 5 pixels. New Layer, Flood fill with Paper 3.
Paste Full tube, resize and place to your liking, Use magic wand, select inside of the frame. Selections, Expand 5 pixels. Invert Selection, use eraser to erase the bottom of the tube so it appears she is coming out of the frame itself. Apply Lokas 3-D Shadow

Element 18, resize and Place to your liking, drop shadow
Element 57, resize and Place to your liking, drop shadow
Element 96, resize and Place to your liking, duplicate, Mirror drop shadow
Element 51, resize and Place to your liking, duplicate, Mirror drop shadow
Element 14, resize and Place to your liking, drop shadow
Element 16, resize and Place to your liking, drop shadow
Element 12, resize and Place to your liking, drop shadow
Element 73, resize and Place to your liking, drop shadow
Element 11, resize and Place to your liking, drop shadow
Element 26, resize and Place to your liking, drop shadow
Element 43, resize and Place to your liking, drop shadow
Element 106, resize and Place to your liking, drop shadow
Element 90, resize and Place to your liking, drop shadow
Resize the signature if needed
The name: I am using the font: Fontdinerdot Sparkly, size 20, #000000, Apply Eye Candy #ffffff, Drop Shadow
Add your copyright information and license number before save
Monday, May 19, 2014
Oceana PTU Tut

Any resemblance to any other tutorial or signature is merely coincidental and is not intended.
I am using the artwork of Arthur Crowe –. You can purchase this artwork and a license to use them HERE you MUST have a license to use this work (Water Goddess)
I am using the font: Akhenaton
I am using the Plugins: Alien Eye Candy 5, Xeno Porcelian, Xeno Radience
I am using "Oceana" From Rissa's Designs, you can find it here (Coming Soon)
I am using mask of your choice
I am using Drop Shadow -3 Vert, 3 Hori, Opacity 74, Blur 5.8 Color #202020
Pieces of the kit used in this tutorial are
Paper 13
Paper 5
Element 54
Element 50
Element 19
Element 18
Element 3
Element 40
Element 33
Element 28
Element 13
Element 63
Element 59
Element 21
Element 15
Element 61
You must have working knowledge of PSP to complete this tutorial. This tutorial was written using PSPX6
Open new Canvas 600*600
New Layer, flood fill with Paper 13, Apply mask and resize to your liking, Merge Group
C/P Element 54, resize to your liking, Use Free hand Select and go around the outside of the frame. New Layer, Flood fill with Paper 5.
Paste Close up Tube between Paper 1 and Frame 5. Select paper layer, select all, float, invert, Select Tube Layer Delete, Apply Xero Porcelain, and then Xero Radience, Drop Shadow, Duplicate. Apply Guassian blur 5.0 to copy, then set to Screen and drop Opacity to 50%. Apply Luminace (L) to Original
Paste Full tube, resize and place to your liking, drop shadow
Element 50
Element 19
Element 18, resize and Place to your liking, drop shadow
Element 3, resize and Place to your liking, drop shadow
Element 40, resize and Place to your liking, drop shadow
Element 33, resize and Place to your liking, drop shadow
Element 28, resize, mirror, and Place to your liking, drop shadow
Element 13, resize, and Place to your liking, Duplicate, mirror, drop shadow
Element 63, resize, and Place to your liking, Duplicate, mirror, drop shadow
Element 59, resize and Place to your liking, drop shadow
Element 21, resize and Place to your liking, drop shadow
Element 15, resize and Place to your liking, drop shadow
Element 61, resize and Place to your liking, drop shadow
Resize the signature if needed
The name: I am using the font: Akhenaton, size 48, #053e87, Apply Eye Candy #ffffff, Drop Shadow
Add your copyright information and license number before save
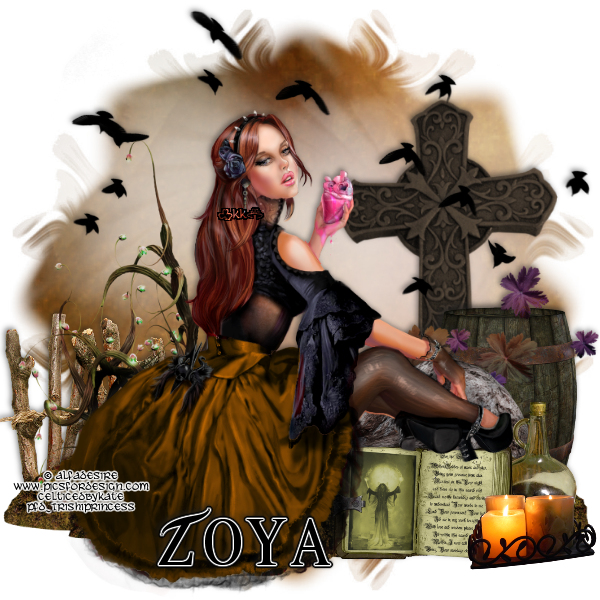
Country Chicken FTU Tut


Any resemblance to any other tutorial or signature is merely coincidental and is not intended.
I am using the artwork of Alfadesire –. You can purchase this artwork and a license to use them HERE you MUST have a license to use this work (Black Chiken)
I am using the font: Texas Ranger
I am using the Plugins: Alien Eye Candy 5
I am using "Yee Haw Baby" From Wicked Princess Scraps, you can find it FTU on her Blog here
I am using mask of your choice
I am using Drop Shadow -3 Vert, 3 Hori, Opacity 74, Blur 5.8 Color #202020
Pieces of the kit used in this tutorial are
Paper 6
Grass Patch
Tree
Cattails
Barrel
Bird
Bird House
Lady Bells
Fence
Quilt
Plant
Painted Flower
You must have working knowledge of PSP to complete this tutorial. This tutorial was written using PSPX6
Open new Canvas 600*600
New Layer, flood fill with Paper 5, Apply mask and resize to your liking, Merge Group
C/P Frame 1, resize to your liking, Use Free hand Select and go around the outside of the frame. New Layer, Flood fill with Paper 6 drop opacity 85%.
Paste Full tube, resize and place to your liking, drop shadow
Grass Patch, resize and Place to your liking, drop shadow
Tree, resize and Place to your liking, drop shadow
Cattails, resize and Place to your liking, drop shadow
Barrel, resize and Place to your liking, drop shadow
Bird, resize and Place to your liking, drop shadow
Bird House, resize and Place to your liking, drop shadow
Lady Bells, resize and Place to your liking, drop shadow
Fence, resize and Place to your liking, drop shadow
Quilt, resize and Place to your liking, drop shadow
Plant, resize and Place to your liking, Duplicate, Mirror drop shadow
Painted Flower, resize and Place to your liking, Duplicate, Mirror drop shadow
Frame 4, resize and Place to your liking, drop shadow
Flower Scatter, resize and Place to your liking, drop shadow
Balloon, Resize and Place to your liking, Drop Shadow
Bench, resize and place to your liking, rotate, Drop Shadow
Heartwire, resize and place to your liking, Drop Shadow
Jar, resize and place to your liking, Drop Shadow
Kitty, resize, place to your liking,Drop Shadow
Bird, resize, place to your liking, Drop Shadow
Resize the signature if needed
The name: I am using the font: Texas Ranger, size 24, #1c0f09, Apply Eye Candy #e4d086, Drop Shadow
Add your copyright information and license number before save
Sunday, May 18, 2014
New PTU Kit - Stargrazer

Beautiful kit in puples and greys, perfect for angels, fae's, or anything in the sky
10 Papers 1000*1000 (Tagger Size)
90 Unique Elements
Friday, May 16, 2014
Mermaid Magick PTU Tut

Any resemblance to any other tutorial or signature is merely coincidental and is not intended.
I am using the artwork of Trinita –. You can purchase this artwork and a license to use them HERE you MUST have a license to use this work (Mermaid)
I am using the font: Chin Chan
I am using the Plugins: Alien Eye Candy 5, Xeno Porcelian, Xeno Radience
I am using "Grace Red Carpet Look" From Tiny Turtle Designs, you can find it here
I am using mask of your choice
I am using Drop Shadow -3 Vert, 3 Hori, Opacity 74, Blur 5.8 Color #202020
Pieces of the kit used in this tutorial are
Paper 30
Paper 36
Element 39
Element 101
Element 105
Element 120
Element 52
Element 35
Element 25
Element 153
Element 134
Element 125
Element 40
Element 91
You must have working knowledge of PSP to complete this tutorial. This tutorial was written using PSPX6
Open new Canvas 600*600
New Layer, flood fill with Paper 30, Apply mask and resize to your liking, Merge Group
C/P Element 39, resize to your liking, Use Free hand Select and go around the outside of the frame. New Layer, Flood fill with Paper 36.
Paste Close up Tube between Paper 36 and Element 39. Select paper layer, select all, float, invert, Select Tube Layer Delete, Apply Xero Porcelain, and then Xero Radiance, Drop Shadow, Duplicate. Apply Gaussian blur 5.0 to copy, then set to Luminace (L) and drop Opacity to 60%.


Paste Full tube, resize, mirror, place to your liking, drop shadow
Element 101, resize and Place to your liking, drop shadow
Element 105, resize and Place to your liking, drop shadow
Element 120,, resize and Place to your liking, drop shadow
Element 52, resize and Place to your liking, drop shadow
Element 35, resize and Place to your liking, drop shadow
Element 25, resize and Place to your liking, drop shadow
Element 153, resize and Place to your liking, drop shadow
Element 134, resize and Place to your liking, drop shadow
Element 125, resize and Place to your liking, drop shadow
Element 40, resize and Place to your liking, drop shadow
Element 91, resize and Place to your liking, drop shadow
Resize the signature if needed
The name: I am using the font: Chin Chan, size 20, #8f20d8, Apply Eye Candy #ffffff and #0c8b7b, Drop Shadow

Add your copyright information and license number before save
Magic Heart PTU Tut

Any resemblance to any other tutorial or signature is merely coincidental and is not intended.
I am using the artwork of Alfadesire –. You can purchase this artwork and a license to use them HERE you MUST have a license to use this work (Magic Heart)
I am using the font: The Alistaren
I am using the Plugins: Alien Eye Candy 5,
I am using "Magic Heart" From Hania's Designs, you can find it here
I am using mask of your choice
I am using Drop Shadow -3 Vert, 3 Hori, Opacity 74, Blur 5.8 Color #202020
Pieces of the kit used in this tutorial are
Paper 9
46
67
3
21
5
39
50
33
10
45
You must have working knowledge of PSP to complete this tutorial. This tutorial was written using PSPX6
Open new Canvas 600*600
New Layer, flood fill with Paper 9, Apply mask and resize to your liking, Merge Group
Paste Full tube, resize, mirror, and place to your liking, drop shadow
46, resize and Place to your liking, drop shadow
67, resize and Place to your liking, drop shadow
3, resize and Place to your liking, drop shadow
21, resize and Place to your liking, drop shadow
5, resize and Place to your liking, drop shadow
39, resize and Place to your liking, drop shadow
50, resize and Place to your liking, drop shadow
33, resize and Place to your liking, drop shadow
10, resize and Place to your liking, drop shadow
45, resize and Place to your liking, drop shadow
Resize the signature if needed
The name: I am using the font: The Alistaren, size 20, #000000, Apply Eye Candy #ffffff & #000000. Drop Shadow
Add your copyright information and license number before save
Wednesday, May 14, 2014
The Fantastically Free Blog Train - Monochromatic - Green

*********************

*********************
You can download my Green (What other color did you expect me to pick) portion here
Monday, May 12, 2014
Formerly PTU now FTU Kit

Sunday, May 11, 2014
New PTU Kit - Baltic
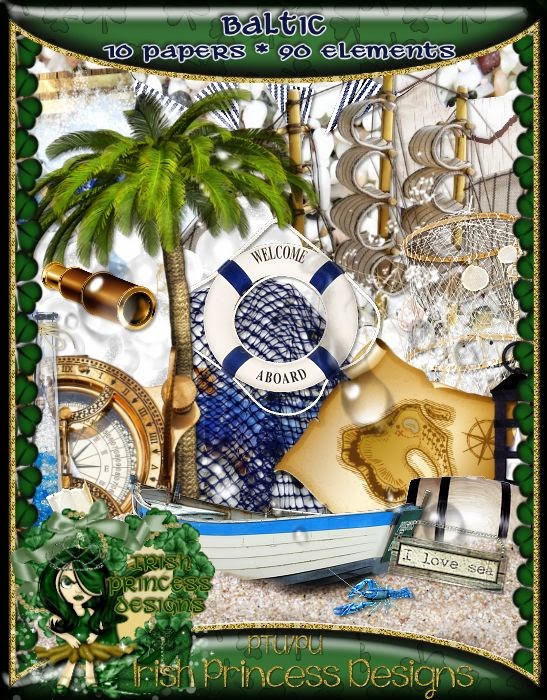
A Huge kit perfect for beach and Sailor tags.
10 1000*1000 Papers (tagger size)
90 Unique Elements
Saturday, May 10, 2014
Flower Beauty PTU Tut


Any resemblance to any other tutorial or signature is merely coincidental and is not intended.
I am using the artwork of Alfadesire –. You can purchase this artwork and a license to use them HERE you MUST have a license to use this work (Flower of Love)
I am using the font: Beach Type
I am using the Plugins: Alien Eye Candy 5
I am using "Exotic Beauty" From Kizzed by Kelz, you can find it here
I am using mask of your choice
I am using Drop Shadow -3 Vert, 3 Hori, Opacity 74, Blur 5.8 Color #202020
Pieces of the kit used in this tutorial are
Paper 33
Element 13
Element 63
Element 66
Element 9
Element 2
Element 115
Element 116
Element 6
Element 47
Element 78
Element 137
Element 58
Element 67
You must have working knowledge of PSP to complete this tutorial. This tutorial was written using PSPX6
Open new Canvas 600*600
New Layer, flood fill with Paper33, Apply mask and resize to your liking, Merge Group
Paste Full tube, resize and place to your liking, drop shadow
Element 13, resize and Place to your liking, drop shadow
Element 63, resize and Place to your liking, drop shadow
Element 66, resize and Place to your liking, duplicate, move up original
Element 9, resize and Place to your liking, drop shadow
Element 2, resize and Place to your liking, drop shadow
Element 115, resize and Place to your liking, drop shadow
Element 116, resize and Place to your liking, drop shadow
Element 6, resize and Place to your liking, drop shadow
Element 47, resize and Place to your liking, drop shadow
Element 78, resize and Place to your liking, drop shadow
Element 137, resize and Place to your liking, drop shadow
Element 58, resize and Place to your liking, drop shadow
Element 67, resize and Place to your liking, drop shadow
Resize the signature if needed
The name: I am using the font: Beach Type, size 14, #c02440, Apply Eye Candy #ffffff, Drop Shadow
Add your copyright information and license number before save
Forget Me Not PTU tut

Any resemblance to any other tutorial or signature is merely coincidental and is not intended.
I am using the artwork of Zindy –. You can purchase this artwork and a license to use them HERE you MUST have a license to use this work (Letting My Dreams Fly)
I am using the font: Cursivessca Kursive
I am using the Plugins: Alien Eye Candy 5
I am using "Forget me Not" From Tasha's Playground, you can find it her stores on her Blog here
I am using mask of your choice
I am using Drop Shadow -3 Vert, 3 Hori, Opacity 74, Blur 5.8 Color #202020
Pieces of the kit used in this tutorial are
Paper 4
Paper 10
Frame 1
Frame 4
Music
Branch
Scatter
Steps
Streetlight
Timepiece
Foliage
Paper
Fabric
Branch 2
Deco2
Bottles
Bird
Sparkles
You must have working knowledge of PSP to complete this tutorial. This tutorial was written using PSPX6
Open new Canvas 600*600
New Layer, flood fill with Paper 4, Apply mask and resize to your liking, Merge Group
C/P Frame 1, resize to your liking, rotate to horizontal. Use Magic Wand, select inside of the frame Selections - Expand 5 pixels. New Layer, Flood fill with Paper 10.
Paste Full tube, resize and place to your liking, drop shadow
Frame 4, resize and Place to your liking, drop shadow
Music,, resize and Place to your liking, place under frame 4, repeat magic wand with Frame 4 and delete leaving music within the frame
Branch, resize, rotate. and Place to your liking, drop shadow
Scatter, resize and Place to your liking, drop shadow
Steps, resize and Place to your liking, drop shadow
Streetlight, resize and Place to your liking, drop shadow
Timepiece, resize and Place to your liking, drop shadow
Foliage, resize and Place to your liking, drop shadow
Paper, resize and Place to your liking, drop shadow
Fabric, resize and Place to your liking, drop shadow
Branch 2, resize and Place to your liking, drop shadow
Deco2, resize and Place to your liking, drop shadow
Bottles, resize and Place to your liking, drop shadow
Bird, resize and Place to your liking, drop shadow
Sparkles, resize and Place to your liking, drop shadow
Resize the signature if needed
The name: I am using the font: Cursivessca Kursive, size 22, #2b495a, Apply Eye Candy #ffffff, Drop Shadow
Add your copyright information and license number before save
Subscribe to:
Posts
(Atom)
MY BLINKIE

Facebook Me
Stores I Sell In


Who I CT For

 "
"
CU Licenses