Tuesday, June 26, 2018
New PTU Kit - Flower Fae

This beautiful kit is perfect for any fairy, garden or flower tag. Lot's of nice colors
170 unique (non-repeated) Elements
30 1000*1000 Papers

Sunday, June 24, 2018
Dragon Magick PTU Tut


Any
resemblance to any other tutorial or signature is merely coincidental
and is not intended.
I
am using the artwork of Rebeca
Sinz
–. You can purchase this artwork and a license to use them HERE
you MUST have a license to use this work (Dragon
Angel)
I
am using the font:
SalemWF
I
am using the Plugins:
Alien Eye Candy 5,
I
am using mask of your choice
I
am using Drop Shadow -3 Vert, 3 Hori, Opacity 74, Blur 5.8 Color
#202020
Pieces
of the kit used in this tutorial are:
-
Paper 11
-
Paper 44
-
Frame 12
-
Frame 3
-
Element 188
-
Element 169
-
Element 118
-
Element 150
-
Element 169
-
Element 130
-
Element 189
-
Element 72
-
Element 103
-
Element 73
-
Element 69
-
Element 38
-
Element 43
-
Element 68
-
Element 67
-
Element 58
-
Element 76
-
Element 95
-
Element 74
-
Element 184
You
must have working knowledge of PSP to complete this tutorial. This
tutorial was written using PSPX8
Open
new Canvas 800*800
New
Layer, flood fill with Paper 11,
Apply mask and resize to your liking, Merge Group
C/P
frame
12,
resize to your liking, Use Magic wand, select inside of the frame,
Selections - expand, 5 pixels, New Layer, Flood fill with Paper 44
Paste
Full tube, resize and place to your liking, drop shadow
Frame
3,
resize and Place to your liking, drop shadow
Element
188,
resize and Place to your liking, drop shadow
Element
169,
resize and Place to your liking, drop shadow
Element
118,
resize and Place to your liking, drop shadow
Element
150,
resize and Place to your liking, drop shadow
Element
169,
resize and Place to your liking, duplicate, mirror, drop shadow both
Element
130,
resize and Place to your liking, drop shadow
Element
189,
resize and Place to your liking, drop shadow
Element
72,
resize and Place to your liking, drop shadow
Element
103,
resize and Place to your liking, duplicate, mirror, drop shadow both
Element
73,
resize and Place to your liking, drop shadow
Element
69,
resize and Place to your liking, drop shadow
Element
38,
resize and Place to your liking, drop shadow
Element
43,
resize and Place to your liking, drop shadow
Element
68,
resize and Place to your liking, drop shadow
Element
67,
resize and Place to your liking, drop shadow
Element
58,
resize and Place to your liking, drop shadow
Element
76,
resize and Place to your liking, drop shadow
Element
95,
resize and Place to your liking, drop shadow
Element
74,
resize and Place to your liking, drop shadow
Element
184,
resize and Place to your liking, drop shadow
Resize
the signature if needed
The
name:
I am using the font: Salem
WF,
size 20, #8d2aa2,
Apply Eye Candy #ebeaee,
Drop Shadow

Add
your copyright information and license number before save
Saturday, June 23, 2018
Love you a Latte PTU Tut

Any
resemblance to any other tutorial or signature is merely coincidental
and is not intended.
I
am using the artwork of Very
Many
–. You can purchase this artwork and a license to use them HERE
you MUST have a license to use this work (Girl
with Coffee)
I
am using the font:
KG
Strawberry Limeaide
I
am using the Plugins:
Alien Eye Candy 5,
I
am using mask of your choice
I
am using Drop Shadow -3 Vert, 3 Hori, Opacity 74, Blur 5.8 Color
#202020
Pieces
of the kit used in this tutorial are:
-
Paper 20
-
Paper 18
-
Frame 1
-
Flower 4
-
Flower 8
-
Grass 1
-
Flower 1
-
Vase
-
Beans 1
-
Beans 2
-
Chocolate
-
Cupcake 1
-
Candy 3
You
must have working knowledge of PSP to complete this tutorial. This
tutorial was written using PSPX8
Open
new Canvas 800*800
New
Layer, flood fill with Paper 20,
Apply mask and resize to your liking, Merge Group
C/P
Frame
1,
resize to your liking, Use Magic wand, select inside of the frame,
Selections - expand, 5 pixels, New Layer, Flood fill with Paper 18
Paste
Full tube, resize and place to your liking, drop shadow
Flower
4,
resize and Place to your liking, duplicate, mirror, drop shadow both
Flower
8,
resize and Place to your liking, duplicate, mirror, drop shadow both
Grass
1,
resize and Place to your liking, duplicate, mirror, drop shadow both
Flower
1,
resize and Place to your liking, duplicate, mirror, drop shadow both
Vase,
resize and Place to your liking, drop shadow
Beans
1,
resize and Place to your liking, drop shadow
Beans
2,
resize and Place to your liking, drop shadow
Chocolate,
resize and Place to your liking, drop shadow
Cupcake
1,
resize and Place to your liking, drop shadow
Candy
3,
resize and Place to your liking, drop shadow
Resize
the signature if needed
The
name:
I am using the font: KG
Strawberry Limeaide,
size 20, #f2d2ac,
Apply Eye Candy #d2c2ac, Drop Shadow
Add
your copyright information and license number before save
Friday, June 22, 2018
Freak Show PTU Tut

Any
resemblance to any other tutorial or signature is merely coincidental
and is not intended.
I
am using the artwork of Enamorte
–. You can purchase this artwork and a license to use them HERE
you MUST have a license to use this work (6-3
Trapeeze)
I
am using the font:
Bleeding
Cowboys
I
am using the Plugins:
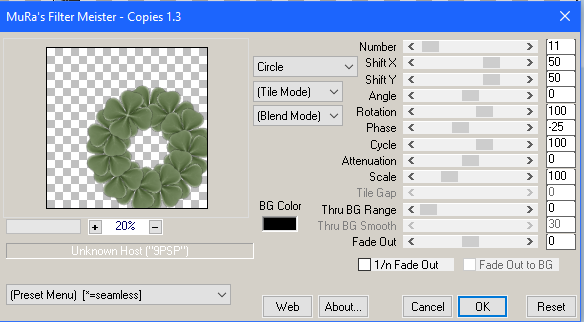
Alien Eye Candy 5, MuRa
Copies
I
am using mask of your choice
I
am using Drop Shadow -3 Vert, 3 Hori, Opacity 74, Blur 5.8 Color
#202020
Pieces
of the kit used in this tutorial are:
-
Paper 3
-
Paper 8
-
Frame
-
Splatter
-
Flags
-
Ferris Wheel
-
Flower 3
-
Poster
-
Merry Go Round
-
Balloons
-
Umbrella
-
Ticket Booth
-
Clown Cluster
-
Tickets
-
Lion
-
Word Art
You
must have working knowledge of PSP to complete this tutorial. This
tutorial was written using PSPX8
Open
new Canvas 800*800
New
Layer, flood fill with Paper 3,
Apply mask and resize to your liking, Merge Group
C/P
Frame,
resize to your liking, Use Magic wand, select inside of the frame,
Selections - expand, 5 pixels, New Layer, Flood fill with Paper 8
Paste
Full tube, resize and place to your liking, drop shadow
Splatter,
resize and Place to your liking, drop shadow
Flags,
resize and Place to your liking, drop shadow
Ferris
Wheel,
resize and Place to your liking, drop shadow
Flower
3,resize
and Place to your liking, Apply
Copies, Drop Shadow
Poster,
resize and Place to your liking, drop shadow
Merry
Go Round,
resize and Place to your liking, drop shadow
Balloons,
resize and Place to your liking, drop shadow
Umbrella,
resize and Place to your liking, drop shadow
Ticket
Booth,
resize and Place to your liking, drop shadow
Clown
Cluster,
resize and Place to your liking, drop shadow
Tickets,
resize and Place to your liking, drop shadow
Lion,
resize and Place to your liking, drop shadow
Word
Art,
resize and Place to your liking, drop shadow
Resize
the signature if needed
The
name:
I am using the font: Bleeding
Cowboys,
size 20, #272e1e, Apply Eye Candy #d2c2ac, Drop Shadow
Add
your copyright information and license number before save
Garden PTU Tut

Any
resemblance to any other tutorial or signature is merely coincidental
and is not intended.
I
am using the artwork of Yuki
–. You can purchase this artwork and a license to use them HERE
you MUST have a license to use this work (Fairy
Garden Collab)
I
am using the font:
Unicorn
Calligraphy
I
am using the Plugins:
Alien Eye Candy 5,
I
am using mask of your choice
I
am using Drop Shadow -3 Vert, 3 Hori, Opacity 74, Blur 5.8 Color
#202020
Pieces
of the kit used in this tutorial are:
-
Paper 6
-
Paper 1
-
Frame 1
-
Fence 2
-
Flower 4
-
Rainbow
-
Leaf 2
-
Flower 2
-
Wheelbarrow
-
Watercan
-
Sunday
-
Flower Box
-
Bird Bath
-
Bee
-
Sparkles
-
Word Art
You
must have working knowledge of PSP to complete this tutorial. This
tutorial was written using PSPX8
Open
new Canvas 800*800
New
Layer, flood fill with Paper 6,
Apply mask and resize to your liking, Merge Group
C/P
Frame
1,
resize to your liking, Use Magic wand, select inside of the frame,
Selections - expand, 5 pixels, New Layer, Flood fill with Paper 1
Paste
Full tube, resize and place to your liking, drop shadow
Fence
2,
resize and Place to your liking, drop shadow
Flower
4,
resize and Place to your liking, drop shadow
Rainbow,
resize and Place to your liking
Leaf
2,
resize and Place to your liking, drop shadow
Flower
2,
resize and Place to your liking, drop shadow
Wheelbarrow,
resize and Place to your liking, drop shadow
Watercan,
resize and Place to your liking, drop shadow
Flower
Box,
resize and Place to your liking, drop shadow
Bird
Bath,
resize and Place to your liking, drop shadow
Bee,
resize and Place to your liking, drop shadow
Sparkles,
resize and Place to your liking
Word
Art,
resize and Place to your liking, apply Glow, drop shadow
Resize
the signature if needed
The
name:
I am using the font: Unicorn
Calligraphy,
size 20, #f4a1cc,
Apply Eye Candy #ffffff,
Drop Shadow
Add
your copyright information and license number before save
Subscribe to:
Posts
(Atom)
MY BLINKIE

Facebook Me
Stores I Sell In


Who I CT For

 "
"
CU Licenses