Sunday, February 19, 2017
Retro Cupcake PTU Tut

Any
resemblance to any other tutorial or signature is merely coincidental
and is not intended.
I
am using the artwork of Very
Many
–. You can purchase this artwork and a license to use them HERE
you MUST have a license to use this work (Cupcake)
I
am using the font:
Bad
Gong
I
am using the Plugins:
Alien Eye Candy 5,
I
am using mask of your choice
I
am using Drop Shadow -3 Vert, 3 Hori, Opacity 74, Blur 5.8 Color
#202020
Pieces
of the kit used in this tutorial are:
-
Paper 40
-
Paper 12
-
Frame 13
-
Element 118
-
Element 73
-
Element 102
-
Element 74
-
Element 137
-
Element 6
-
Element 17
-
Element 15
-
Element 46
-
Element 5
-
Element 175
You
must have working knowledge of PSP to complete this tutorial. This
tutorial was written using PSPX8
Open
new Canvas 800*800
New
Layer, flood fill with Paper 40,
Apply mask and resize to your liking, Merge Group
C/P
Frame
13,
resize to your liking, Use Magic wand, select inside of the frame,
Selections - expand, 5 pixels, New Layer, Flood fill with Paper 12
Paste
Close up Tube between Paper 12
and Frame
13.
Select paper layer, select all, float, invert, Select Tube Layer
Delete, Duplicate, Apply Luminance
Legacy, drop shadow
Paste
Full tube, resize and place to your liking, drop shadow
Element
118,
resize and Place to your liking, drop shadow
Element
73,
resize and Place to your liking, drop shadow
Element
102,
resize and Place to your liking, drop shadow
Element
74,
resize and Place to your liking, drop shadow
Element
137,
resize and Place to your liking, drop shadow
Element
6,
resize and Place to your liking, drop shadow
Element
17,
resize and Place to your liking, drop shadow
Element
15,
resize and Place to your liking, drop shadow
Element
46,
resize and Place to your liking, drop shadow
Element
5,
resize and Place to your liking, drop shadow
Element
175,
resize and Place to your liking, drop shadow
Resize
the signature if needed
The
name:
I am using the font: Bad
Gong,
size 20, #48b0b1,
Apply Eye Candy #f5deda
Drop Shadow

Add
your copyright information and license number before save

New PTU Kit - Celtic Spring

This beautiful kit is equal parts St Patrick's Day and Spring. Made to match "Spring" by Kajenna. Pinks and Greens abound. Perfect for either topic
100 Unique Elements
20 1000*1000 (Tagger Size)

Saturday, February 18, 2017
Amethyst PTU Tut

Any
resemblance to any other tutorial or signature is merely coincidental
and is not intended.
I
am using the artwork of Zindy
–. You can purchase this artwork and a license to use them HERE
you MUST have a license to use this work (Candy
Flossed)
I
am using the font:
Lovers
Quarrel
I
am using the Plugins:
Alien Eye Candy 5,
I
am using mask of your choice
I
am using Drop Shadow -3 Vert, 3 Hori, Opacity 74, Blur 5.8 Color
#202020
Pieces
of the kit used in this tutorial are:
-
Paper 5
-
Paper 4
-
Frame 1
-
Scatter
-
Leaves
-
Flowers
-
Tassel
-
Flowers 5
-
Flower 1
-
Ring
-
Clock
-
Sparkle
You
must have working knowledge of PSP to complete this tutorial. This
tutorial was written using PSPX8
Open
new Canvas 800*800
New
Layer, flood fill with Paper 5,
Apply mask and resize to your liking, Merge Group
C/P
Frame
1,
resize to your liking, Use Magic wand, select inside of the frame,
Selections - expand, 5 pixels, New Layer, Flood fill with Paper 4
Paste
Tube between Paper 4
and Frame
1.
Select paper layer, select all, float, invert, Select Tube Layer
Delete, Duplicate, Apply Guassian blur 3.0 to original, Drop
Shadow
then set to Soft Light and drop Opacity to 60% to Copy
Scatter,
resize and Place to your liking, Drop Shadow
Leaves,
resize and Place to your liking, duplicate, mirror, drop shadow both
Flowers,
resize and Place to your liking, duplicate, mirror, drop shadow both
Tassel,
resize and Place to your liking, duplicate, mirror, drop shadow both
Flowers
5,
resize and Place to your liking, duplicate, mirror, drop shadow both
Flower
1,
resize and Place to your liking, duplicate, mirror, drop shadow both
Ring,
resize and Place to your liking, Drop Shadow
Clock,
resize and Place to your liking, Drop Shadow
Sparkle,
resize and Place to your liking, Drop Shadow
Resize
the signature if needed
The
name:
I am using the font: Lovers
Quarrel,
size 20, #7d6273,
Apply Eye Candy #dcd3d8,
Drop Shadow
Add
your copyright information and license number before save
Cupcake PTU Tut

Any
resemblance to any other tutorial or signature is merely coincidental
and is not intended.
I
am using the artwork of Rebeca
Sinz
–. You can purchase this artwork and a license to use them HERE
you MUST have a license to use this work (Cucake)
I
am using the font:
Love
Letters
I
am using the Plugins:
Alien Eye Candy 5,
I
am using mask of your choice
I
am using Drop Shadow -3 Vert, 3 Hori, Opacity 74, Blur 5.8 Color
#202020
Pieces
of the kit used in this tutorial are:
-
Paper 9
-
Paper 21
-
Element 108
-
Element 66
-
Element 68
-
Element 95
-
Element 90
-
Element 40
-
Element 65
-
Element 09
-
Element 46
-
Element 39
-
Element 100
-
Element 60
You
must have working knowledge of PSP to complete this tutorial. This
tutorial was written using PSPX8
Open
new Canvas 800*800
New
Layer, flood fill with Paper 9,
Apply mask and resize to your liking, Merge Group
C/P
Element
108,
resize to your liking, Use Magic wand, select inside of the frame,
Selections - expand, 5 pixels, New Layer, Flood fill with Paper 21
Paste
Full tube, resize and place to your liking, drop shadow
Element
66,
resize and Place to your liking, duplicate, mirror, drop shadow both
Element
68,
resize and Place to your liking, duplicate, mirror, drop shadow both
Element
95,
resize and Place to your liking, duplicate, mirror, drop shadow both
Element
90,
resize and Place to your liking, duplicate, mirror, drop shadow both
Element
40,
resize and Place to your liking, drop shadow
Element
65,
resize and Place to your liking, drop shadow
Element
09,
resize and Place to your liking, drop shadow
Element
46,
resize and Place to your liking, drop shadow
Element
39,
resize and Place to your liking, drop shadow
Element
100,
resize and Place to your liking, drop shadow
Element
60,
resize and Place to your liking, drop shadow
Resize
the signature if needed
The
name:
I am using the font: Love
Letters,
size 20, #000000,
Apply Eye Candy #ff7eb5,
Drop Shadow
Add
your copyright information and license number before save
Sunday, February 12, 2017
New PTU Kit - Watercolor Garden
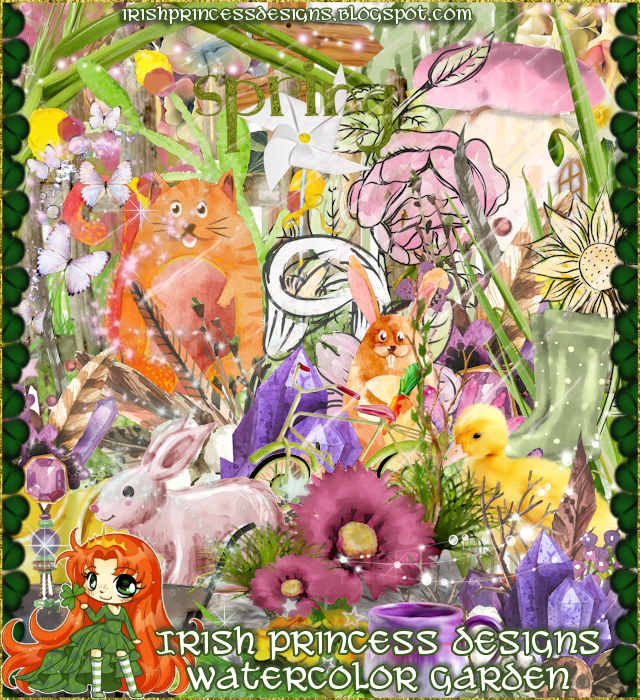
This kit is full of gorgeous hand drawn watercolor elements. Perfect for Spring, Garden or feminine tags.
100 unique elements
20 papers 1000*1000 (Tagger Size)
Monday, February 6, 2017
How to make a Watermark
Pick the text you'd
like to use. Type out your mark in white. For this we'll use the
word Sample. I use size 8 or 6, something small, but still readable.

Selections – From
Vector Object
Selections –
Modify-Expand – Expand by 2
New Raster Layer,
put the vector text layer over the top
Flood Fill the
Raster layer with black – Deselect

Merge the two layers
together as a Raster
Save as a PSP image.
C/P to your image
and place where you want. Change the Layer style to Overlay


Bam! You've just
created your own watermark! If you have questions, please email me, keep the rippers away!
Sunday, February 5, 2017
Flower Girl PTU Tut

Any
resemblance to any other tutorial or signature is merely coincidental
and is not intended.
I
am using the artwork of Zindy
–. You can purchase this artwork and a license to use them HERE
you MUST have a license to use this work (Flower
Girl Summer)
I
am using the font:
Sadhira
Script
I
am using the Plugins:
Alien Eye Candy 5,
I
am using mask of your choice
I
am using Drop Shadow -3 Vert, 3 Hori, Opacity 74, Blur 5.8 Color
#202020
Pieces
of the kit used in this tutorial are:
-
Paper 1
-
Paper 2
-
Frame 1
-
Element 24
-
Element 1
-
Element 16
-
Element 3
-
Element 10
-
Element 17
-
Element 11
-
Element 2
-
Element 22
-
Word Art
You
must have working knowledge of PSP to complete this tutorial. This
tutorial was written using PSPX8
Open
new Canvas 800*800
New
Layer, flood fill with Paper 1,
Apply mask and resize to your liking, Merge Group
C/P
Frame
1,
resize and
rotate
to your liking, Use Magic wand, select inside of the frame,
Selections - expand, 5 pixels, New Layer, Flood fill with Paper 2
Paste
Tube between Paper 2
and Frame
1.
Select paper layer, select all, float, invert, Select Tube Layer
Delete
Element
2,
resize and Place to your liking, drop shadow
Element
158,
resize and Place to your liking, duplicate, mirror, drop shadow both
Element
157,
resize and Place to your liking, duplicate, mirror, drop shadow both
Element
4,
resize and Place to your liking, duplicate, mirror, drop shadow both
Element
159,
resize and Place to your liking, duplicate, mirror, drop shadow both
Element
3,
resize and Place to your liking, duplicate, mirror, drop shadow both
Element
149,
resize and Place to your liking, duplicate, mirror, drop shadow both
Element
154,
resize and Place to your liking, duplicate, mirror, drop shadow both
Resize
the signature if needed
The
name:
I am using the font: Sadhira,
size 20, #94403c,
Apply Eye Candy #ffffff,
Drop Shadow
Add
your copyright information and license number before save
New PTU Kit - Beary Sweet

Yellows, Blues and Whites make up this cute kit. Honey bees, a cute bear and plenty of flowers make up this kit.
100 Unique Elements
20 1000*1000 Papers (Tagger Size)
Subscribe to:
Posts
(Atom)
MY BLINKIE

Facebook Me

Stores I Sell In


Who I CT For

 "
"
CU Licenses